DIY Guestbook Ring Pillow
This DIY puts a new spin on how we use guestbooks, adding a touch of surprise on the day of the wedding! Annie of Anniemade was inspired from her own wedding, where she incorporated her guests’ RSVP wishes in her wedding ceremony. Here, using a pre-made ring pillow, you don’t even need to know how to sew!

From Anniemade: Guestbooks are wonderful to have at your wedding, engagement party, and other celebrations, and this project is one way to celebrate your friends and family’s great advice in a creative way.
With a few materials, this ring pillow becomes a beautiful, easy-to-make keepsake when you decorate it with messages gathered from your RSVP cards or a guestbook from your engagement party. And the best news is, there’s practically no sewing involved.

Here’s what you need:
Supplies
Any white ring pillow
10″ of satin ribbon
Approximately 5″ of embroidery floss
Embroidery needle
Scissors
1 Piece of 8.5 x 11″ Iron-On Transfer Paper
Iron
1 Piece of Off White Cotton Fabric that is 3 x as wide and 2 x as tall as the ring pillow
Messages from your family and friends, scanned (from RSVP cards or engagement party/couple’s shower)
Directions:
Gathering Your Guestbook Messages
This project provides you an opportunity to have something in your wedding that incorporates advice and sentiments from your friends and family. You can gather these messages by having specific family or friends write messages on paper (whether at an engagement party or sent in with your wedding RSVP).

Making a Fabric Transfer
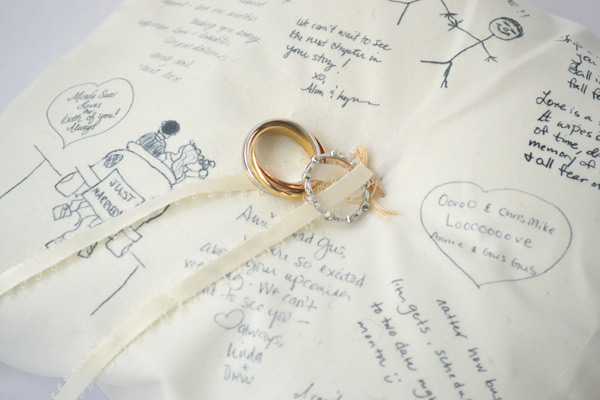
From there, scan all messages you received from guests, arranging them how you’d like to place on your pillow. Here I scanned the cards to fit the front of my pillow (7.5″ x 7.5″). If you have more messages you’d like to include, you can scan them all and iron on over the entire fabric.

Using your computer software or printer settings, reverse the scanned messages/drawings so they are mirrored. If you have Photoshop, this setting is in Edit > Tranform > Flip Horizontal. If you do not have Photoshop and use a PC, open Microsoft Paint by going to Start Programs or All Programs, Accessories then choose Paint or MS Paint. Go to File, Open and open your image. Now go to the Image in menu bar and choose Flip/Rotate. hose Horizontal then click OK.
Then print onto your one sheet of iron-on transfer paper.

Creating the Fabric Pillow Cover
Set your iron on high with no steam and press the transfer to the very middle of the off white cotton fabric. Press hard for several minutes, ensuring that the entire design is transferred.
Then, following the photos, fold the fabric around the pillow (after removing any decoration if you’re using a store-bought ring pillow). You can tie the ends of the pillow or tuck them in and pin with two safety pins in place.

View step-by-step photos
Adding the Ribbons:
Thread your small piece of embroidery floss through the center of the pillow, going through the store bought pillow as well. Pull the thread through and pull it through the very center of the satin ribbon that the rings will be tied to. Then pull the thread back through and tie a small knot.
Now your ribbons are ready to tie to your rings and be carried down the aisle, blessed by all the wonderful words of wisdom of your guests!
Remember you can find gently used ring pillows for sale on Recycle Your Wedding!